Doubling Self-portraits
Jamie Keddie, Spain
Jamie Keddie is an English teacher and writer. He is based in Barcelona and is currently working to complete his first book, Imperfect Tomatoes, which he describes as a self help book for all Spanish learners of English. E-mail: jamiekeddie@hotmail.com

Menu
Introduction
Day 1: preparation and homework
Anticipated problems
Day 2: Doubling the pictures
The story behind the article
What follows is a lesson plan that incorporates a technique called 'doubling'. The activity takes place over two days.
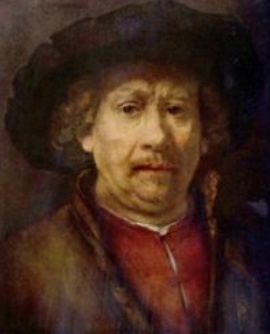
Rembrandt, Self-Portrait (c. 1655)
- For this activity, you will need to obtain a number of self-portraits of famous
artists. One way to do this would be to make prints from the following link:
en.wikipedia.org/wiki/Self_portrait
(NB When using Wikipedia, you will be able to see any image in its full size by left clicking your mouse over it.)
- If you are teaching a smallish class, try to print off as many images as you have
students. For example, when I taught a class of eight students, I chose the following
eight artists:
- Rembrandt
- Picasso
- Leonardo da Vinci
- Van Gogh
- Frida Kahlo
- Henri Matisse
- Paul Gauguin
- Francisco Goya
NB1 It might be best to avoid some painters e.g. Egon Schiele as some students may find the paintings a bit rude.
NB 2 Paper and printer ink are expensive. In order to save money, you can print four different images onto each sheet of A4 paper and then cut them up and laminate them if possible.
- As an alternative to making prints, you could download the pictures directly onto
your hard drive. In order to do this, right click on an image and select 'Save image
as …'. If you are going to opt for this method, you will need a computer to display
the pictures in class.
- Pin the self-portraits up onto the classroom walls, thus transforming the place into
an art gallery. Beside each piece, stick a post-it note that contains the name of the
artist. (If you decided to take the digital option, arrange the pictures as a
slideshow.)
- As your students come into class, let them walk around the gallery (or see the
slideshow) and look at the work on display. Find out if they know who the artists
are, what they know about them and whether or not they like their work.
- Once discussion has died down, tell your class that you want each student to choose
one of the artists to investigate for homework. Give out the following instructions:
Web Quest
- Write a very brief biography of your artist's life. Include information about his/her work and find out about his/her place in art history.
- Make a quick sketch of a painting that you like by your artist (optional).
|
Give your students a few days to complete it.
You could decide to set a minimum number of words for the task (150, for example).
NB If possible, everyone should choose a different artist to investigate.
Many of us teach classes of students that don't do homework. In this case, you could do any of the following:
- Allow them to carry out the web quest during class time (if you have access to a computer room).
- Bring in photocopies of the Wikipedia entry for each featured artist and give them out to your students. Get your students to use the pages to investigate their chosen artists in class.
- As a very last resort, you could prepare short paragraphs for each artist yourself.
- Put the pictures back up on the classroom walls.
- Get each of your students to choose a new artist from the gallery (i.e. one that they did not choose for their web quest homework).
- Tell your students to imagine that they are going to meet this new artist. In preparation for the encounter, they should think of 6-8 questions that they are going to ask him or her.
NB Again, everyone should choose a different artist if possible.
- Start with a random artist (Gauguin, for example). Ask who chose to investigate him for homework and get this student to sit in a chair under the self-portrait on the wall.
- Have the student who prepared the questions for Gauguin put them to the self-portrait. Of course, Gauguin himself can't answer these - this is the job for the student sitting underneath his portrait. The student answering the questions on the artist's behalf is the 'double'.
- Repeat this process for every artist in the room.
- Finally, get your students to pin their web quest assignments on the wall beside the appropriate self-portraits. Let your students browse the gallery once more and read each other's work.
- Collect in the assignments for marking.
It was Mario Rinvolucri that told me about doubling pictures. I saw him demonstrating the technique at a conference and sent him an email to ask:
Dear Mario
I've got a very quick question for you. I saw you giving a workshop recently in which you 'doubled' a picture. Is this a standard term? Do you know the origin of the technique?
Hope all is well
Jamie
Mario answered back:
Dear Jamie
The term 'doubling' comes from psychodrama and refers to one group member going up behind the protagonist and speaking on the protagonist's behalf. Often the doubler has had an insight that the protagonist has blocked out while working on his/her problem/s. The protagonist has the right to either accept or dismiss the doubling.
When working in class with a picture I have never had a case of the person in the picture objecting to what their double says!!
Apart from pictures I have had students " double" their own glasses, their own earrings, their own shoes.
Try bringing a worm into class and ask someone to come and sit behind it and answer the class's questions to the worm about its life and interests? After the interview the worm gives two letters to the students about its biology since the double may have got some facts wrong. One of the letters is in very simple language while the other is in more complex terms. This is rather a good CLIL lesson.
Warmly yours
Mario

Please check the Teaching through Art and Music course at Pilgrims website.
Please check the CLIL - Teaching Other Subject Through English course at Pilgrims website.


|