Working with a Modified Sound / Color Chart
Donald E. Cherry, US/Japan
Donald E. Cherry is an associate professor at Hiroshima International University. He has been teaching English as a second language since 1985, first in his hometown of Chicago, then in Japan. He has been working with the Silent Way teaching approach since attending the School for International Training in 1993. E-mail:doncherry@mac.com
Menu
The Sound/Colour Chart
Advantages of the Chart
Modifying the Chart
A class using the Chart
Subsequent classes
Conclusion
References
The value of pronunciation practice even at the earliest stages of language learning is increasingly being recognized. Pronunciation activities, however, can be tedious and mechanical, and are often limited to simply repeating after a native-speaker model. Some teachers have found the Sound/Colour Chart to be a solution to this problem, allowing them to approach pronunciation in an active, engaging, and non-mechanical way. Using this chart, they have found a way to work with students in a way that more fully respects the considerable intellect and ability that students bring to the classroom.
In this paper, I will describe the English Sound/Colour Chart, and discuss some of its strengths. I will discuss some of the disadvantages the original chart presents for language teachers, and I will explain how I have modified the chart to make it simpler, more efficient, and easier to use. Finally, I will describe classes using this modified Sound/Colour Chart. This is done to provide some concrete examples of how the chart can be used, and to provide a starting point for the reader to create their own lessons to meet their own unique students and teaching situations.
The English Sound/Colour Chart, created by the late educator Caleb Gattegno, is a 57 cm. by 42 cm. wall chart with 58 coloured rectangles. Thirty-seven of the rectangles are of one color, representing a single sound in English, and 21 are of two, representing two sounds. The vowels are placed above a line nearly halfway down the chart, and the consonants are placed below this line. The two-colored rectangles are divided horizontally and are read from top to bottom. Thus, the color for the /a/ phoneme is placed above the color for the /y/ phoneme to create a white/light pink rectangle for the diphthong found in “high.” On the consonant side of the chart, the sound made by “qu” in words such as “quite” is made up of a single rectangle whose top half is the color for /k/ and bottom the color for /w/.
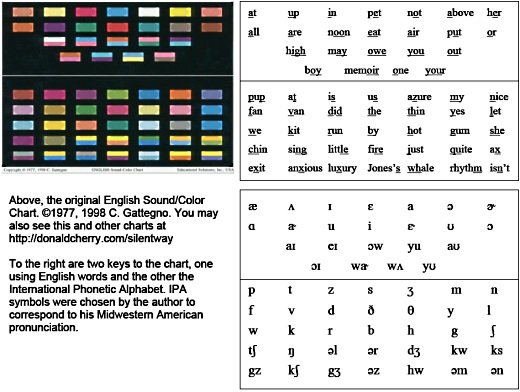
The Sound/Colour Chart is part of a larger system, which includes the Fidel and the Word Charts. The Fidel for English is a set of eight wall charts with lists of spellings for each of the rectangles on the Sound/Colour Chart, coloured the same way as the rectangle. The /aı/ rectangle, for example, is represented by a list of 12 spellings, each coloured white on top and light pink on bottom. The 12 Word Charts represent a functional vocabulary of English. The words on these charts are printed in colours corresponding to the other charts, indicating their pronunciation. The word “my,” for example, is printed with an orange “m” and a white/light pink “y.”
The choice of colours in this system is largely arbitrary, but sharply contrasting or very similar colours seem to have been selected to contrast or show similarities between sounds. For example, the colours for /i/, /ı/, and /y/ are, respectively, red, pink, and light pink. The /u/ in “too,” in contrast, is dark green. The system is not entirely consistent, however, probably because of the difficulty in assigning a limited number of commercially reproducible colours to so many sounds to represent such a complex system of relationships. In addition to showing relationships among the sounds, some individual colours seem to have been chosen for other reasons, for example the bright shade of yellow chosen to represent the schwa, perhaps to highlight this important sound so central to English pronunciation (Moyer, 1977).
The Sound/Color Chart is used to engage students in a variety of games to help them work on pronunciation at all levels, from individual sounds to connected speech. These games will be described later in further detail, but a brief summary of the rules or conventions for the games is as follows: 1) when the teacher or a student taps a rectangle with a pointer, the sound(s) for that rectangle is/are uttered by the students; 2) when several rectangles are tapped in succession, the sounds are uttered in that order, usually forming a word or a sentence; 3) a brief pause or lowering of the pointer indicates a break between words or the end of a sentence; 4) stress may be indicated by tapping one rectangle more forcefully than the others; 5) phrasing may be indicated by tapping a series of rectangles very quickly, or once a sentence has been introduced with the chart, the teacher can use her fingers to represent the words in the sentence, placing fingers together where the words link or separating them where there should be a pause. Individual teachers will of course devise their own rules, conventions and gestures to use in addition to these.
To illustrate some advantages of the Sound/Color Chart, it may help to begin with the following classroom scenario. Attempting to help her Japanese student work on the pronunciation of the word “son” an EFL teacher models the word loudly and clearly. The student replies, “sung.” The teacher says “son” again, and once more the student replies “sung.” The teacher says “son” again, but this time holds the final /n/ for a long time. The student, understanding now that something is wrong with his pronunciation and feeling a little nervous about that, smiles and nods his head to assure the teacher that he now understands, then says “sung” again, this time holding the final /ŋ/ for a long time. The teacher now nods her head, as if she now understands what the problem is, then turns and writes “son” on the blackboard. The student, completely baffled now, smiles wider and nods his head more vigorously than before, but his shaky voice betrays his uncertainty as he says something like “sungm.”
Let me point out some of the challenges confronting this teacher and student, and suggest how they may be better met by using the Sound/Color Chart.
Difficulty Hearing Sounds Modeled
Due to interference from his native language, the student’s hearing is filtering an important sound in the new language, not allowing him to hear the final /n/ in “son.” The student here pronounced the word as he heard it--“sung.” His ears are tuned, as it were, to the Japanese channel, where there is no final /n/.
The Sound/Colour Chart provides another way of reaching the student, this one through the eyes rather than the ears. The teacher could, for example, begin by modelling “meaning,” a word that is quite easy for native Japanese speakers to say and hear. The teacher could show the students the five rectangles representing the sounds in this word. The teacher could then tap the rectangles in different sequences to elicit from the student such nonsense words as “min,” “mim,” “neen,” “ning,” “neeming,” “mimeeng,” “meemeem,” even the Vietnamese-sounding “nging.” This sort of playful work would help sensitize the student to English nasals and help him develop the ability to produce a final /n/.
Another approach might be for the teacher to begin with the word, “sunny.” Like “meaning,” the student would be able to pronounce the /n/ here because of its position in the middle of the word rather than at the end. The teacher could then gradually work with the student to reduce the final /i/, thus leaving the /n/ in the final position. This could be done by slowly moving the pointer from one rectangle to the next, having the student elongate each sound and blend it gradually into the next. As the pointer lay on the /n/ rectangle, the student would incorrectly produce the /ŋ/ phoneme, but as the pointer slowly approached /i/, the student would glide into an /n/ in preparation for saying this next sound. Here the teacher would stop the pointer just short of the /i/ rectangle, leaving the student much closer to a final /n/. This might sound something like /ssssııııŋŋŋŋnnnı/, a considerable improvement that could then be refined by working to eliminate the /ŋŋŋŋ/and /ı/.
Difficulty Hearing Oneself
Another problem the student is faced with in the lesson above is the difficult task of trying to match two sounds that come to him in two very different ways, one he is hearing from the teacher through air conduction alone and the other that he is hearing from himself through both air and bone conduction. To appreciate how different these two hearings are, one need only think about how strange their voice sounds to them on an audio recording.
The student needs someone to lend him an ear. He needs someone to listen carefully to what he is saying, and let him know what it sounds like outside his head. This can involve something as simple as the teacher just saying, “No, try again.” This kind of simple feedback can be very powerful and may by itself prove sufficient. The student is, after all, developing a physical skill that will require trial and error, like riding a bicycle. Unlike riding a bicycle, however, he may not always know when he has made a mistake, and may need someone to tell him when he has swerved or fallen.
If, however, this type of feedback proves insufficient, the chart can be used to provide more precise visual feedback. With this feedback, students can more productively place their attention on the voluntary muscles of their vocal tract rather than on the involuntary functioning of hearing, sensitizing themselves to how the new sounds feel in their mouth and throat. A teacher working with the Sound/Colour Chart could, for example, respond to the student’s initial attempt at “son” by showing him what he actually said, that is by tapping the rectangles corresponding to “sung.” The teacher would then tap the rectangles for “son,” and invite the student to try again. The student could then literally see that the difference was in the final sound, and he could direct his efforts accordingly. Should the student respond with “sum” or “sungm,” the teacher could tap the rectangles corresponding to either of these words as well, then tap again the rectangles for “son,” inviting additional experimentation by the student. The Sound/Colour Chart essentially opens another channel of communication between the teacher and student, this one visual.
The Distraction of Letters
Seeing the word he was trying to say did not help this student’s pronunciation, and perhaps made matters worse. A common error among native Japanese speakers is to see the letter “n” as equivalent to a generalized nasal in Japanese that is realized as /ŋ/ /n/ or /m/ in a medial position, but only as /ŋ/ in a final position. If the final /ŋ/ is drawn out for emphasis or the benefit of a pestering teacher, the speaker will often allow his lips to close somewhat, producing something close to /m/, which is exactly what this student did.
The teacher could work with the student until his “n” becomes an /n/, but sometimes “n” is /ŋ/ (“longer,” “thank”), and sometimes /n/ is something else (“know,” “gnat,” etc.) The presence of different spellings for the same sound, and different sounds for the same spelling is especially evident in the case of the vowels, where for example the /u/ sound in “you” can be written in at least a dozen ways, one of which is “o” (as in “do”), which can in turn be used to represent ten other sounds. The Sound/Colour Chart effectively addresses this feature of English by replacing letters with colours so students may more effectively work on pronunciation by postponing the additional challenge of English spelling.
The International Phonetic Alphabet can be used in place of colours, as in the chart created by Adrian Underhill (1994), and one great advantage of doing so would be to provide students with a tool that would allow them to decode the pronunciation symbols in their dictionaries, but there are some disadvantages in this. First, the IPA symbols are similar, and in some cases identical, to English letters, and this can mislead students in the same way as the letters do. Second, students often bring with them faulty assumptions about the sounds represented by IPA symbols. They may be familiar with a symbol, they may even be able to correctly identify where it occurs in a word, but they may have the sound wrong all the same. Using colours gives students a fresh look at the sound. Finally, IPA symbols cannot be incorporated into the Word Charts and Fidel as elegantly as colours can.
The Distraction of Meaning
In addition to freeing students to work on pronunciation without the distraction of spelling, the Sound/Colour Chart also allows them to work without having to be bothered with the meaning of what they are saying. The phoneme /n/ has no meaning by itself, and although the word “son” does of course have meaning, knowing this meaning is not going to help the student above do the physical work necessary to pronounce a final /n/. Furthermore, the Sound/Colour Chart can be effective in dealing with fossilized mispronunciations of familiar words precisely by hiding the meaning of the words behind colour. Even above a phonemic level, there is value to working on prosodics such as rhythm, stress, and phrasing without focus on meaning, again just to get at the physical nature of the task.
The original English Sound/Colour Chart is an insightful and imaginative response to the challenge of learning a new sound system. There are, however, some features of the chart that can be problematic for EFL classes. These features can be traced to the chart’s roots in the Fidel, which was originally used to teach literacy. The Sound/Colour Chart was made using the Fidel as a guide, with each column of spellings on the Fidel carried over to the Sound/Colour Chart as a single rectangle. Consequently, the original Sound/Colour Chart wound up reflecting not only the sounds of English but the spelling as well. This can be seen in the large number of two-coloured rectangles. Four of these 21 rectangles represent the various phonemic combinations for “x” (ex: /ks/ in “fox,” /gz/ in “exam,”), five represent syllabic consonants (ex: “little,” “rhythm”), one is there for the /kw/ of “quiet,” one for the /hw/ that is possible for “when,” one for the /dƷ/ in “jar,” and the remaining nine are found in the vowel portion of the chart as diphthongs. In addition to determining the number of rectangles on the Sound/Colour Chart, the Fidel also determined the layout of these rectangles, placing them in an order Gattegno considered best for teaching literacy.
For the different purpose of teaching English as a Foreign Language, some teachers have modified the chart, reducing the number of rectangles and rearranging the ones remaining. The chart below is one such modification.
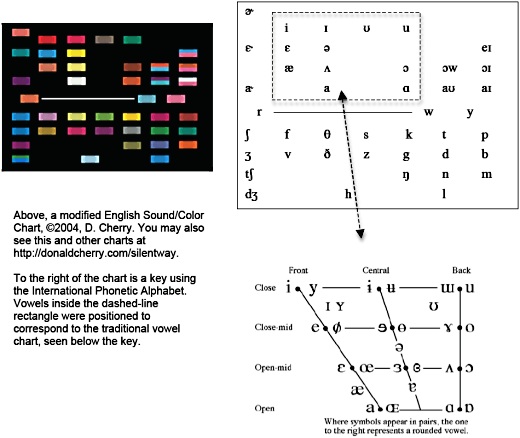
Cardinal vowels, indicated by the dashed-line rectangle on the key to the chart, were positioned to indicate their vertical and horizontal tongue position, corresponding roughly to the traditional vowel chart. The so-called “r-colored” vowels are placed to the left of this group, in line with the vowels that they r-color, and the diphthongs are to the right, more or less in line with the vowels they combine.
The first row below the line is comprised of unvoiced consonants, and the second row their voiced counterparts. One unvoiced/voiced pair, /tʃ/ and /dƷ/, is placed below these rows and to the left for reasons of space. The sounds /ɳ/, /n/ and /l/, and /m/ are placed in columns with sounds that are made in same area of the vocal tract. The /h/ phoneme is placed by itself at the bottom of the chart, reflecting the somewhat special nature of this sound. The phonemes /r/, /w/, and /y/ are placed midway between the vowels and consonants, reflecting the vowel-like qualities of these sounds.
While this chart is clearly guided by phonetic analysis, it is not bound by it. Such an analysis may fault the placement of /h/ by itself rather than with the other fricatives, or /r/ in a row with the semi-vowels /y/ and /w/. The chart is a classroom tool created to help students become aware of, and practice aspects of, English pronunciation. To this end, the perception of sounds and their production sometimes takes precedence over a more rigorous phonetic analysis.
The following is a description of a class using the Sound/Color Chart. This is included to provide some concrete examples of how the chart can be used. It is not meant as a lesson plan, and should not limit the reader’s imagination to the details of these particular lessons. Rather, it should be seen as a starting point for teachers to develop their own ideas. Another purpose for including this description is to provide discovery activities for the reader, who is encouraged to participate in this class wherever practical. By doing some of the same activities the students are described as doing, the reader may arrive at some new awareness that may prove helpful regardless of which method or material they use in their classroom. Other excellent sources of such discovery exercises can be found in Underhill’s Sound Foundations and Catford’s A Practical Introduction to Phonetics (1988).
Twenty 19-year-old Japanese university students are seated before a whiteboard with the modified Sound/Color chart on it. After allowing some time for the students to observe the chart, the teacher touches the /i/ rectangle with a pointer, and silently mouths this phoneme in an exaggerated way, with a wide, tense smile. She waits, inviting students to say this sound, and acknowledges each utterance by the students with a nod, encouraging some students through gesture to make the sound tenser.
The teacher now touches the /u/ rectangle, three rectangles to the right of /i/, and mouths an exaggerated /u/. She moves quickly from student to student as they attempt this sound, indicating which sounds are acceptable and which are not. She helps students improve their sounds sometimes through gesture and sometimes by giving them brief advice in English or Japanese.
The teacher touches /i/, eliciting this sound from the students, then touches /u/, eliciting this sound, then /i/ again, then /u/ again. Now, she touches /i/ and holds the pointer there, gesturing for the students to hold the sound. She then moves the pointer in a slow arc over the two rectangles between /i/ and /u/, and brings the pointer down onto the /u/ rectangle. As she does this, the students say a long /i/, then change to a /u/ just as the /u/ rectangle is touched. The teacher goes the other way then, from a long /u/ to a final /i/, leading the students to say something like “ooooooooooooooee.”
The students go back and forth like this a few times, but the teacher makes a face as if something is wrong. She holds the pointer again on the /i/, and gestures for just one student to speak. The student produces an /i/. The teacher begins the slow arc towards /u/ but the student continues with /i/. The teacher makes a show of trying to pull the pointer off the sound, as if it were stuck there. The students laugh a bit. The teacher begins a slow arc toward the /u/ again, and this time the student begins to gradually change the sound, moving towards and finally ending with /u/ once the pointer reaches that rectangle. The teacher goes the other way now, this time with a different student. The teacher and the students work this way, sometimes individual students speaking and sometimes the whole class, until they are able to make a gradual transition between /i/ and /u/ in both directions.
The teacher puts the back of her hand against the bottom of her jaw, and directs the students to do the same. She makes a show of using this hand to keep her jaw from opening any wider while she silently mouths the movement back and forth between these two sounds. It can clearly be seen that her hand does not move at all, making plainly visible the absence of jaw movement along this row of “high,” or “close,” vowels. She has the students do the same, first silently mouthing the sounds, then whispering them, then saying them. The teacher then has the students place their forefinger and thumb on either corner of their mouth. She has them again silently mouth the movement back and forth, then whisper it, then say it. This highlights the lip spreading and rounding, as the students move back and forth between the very front and the very back vowel.
As the practice progresses, the arc made by the pointer gets lower and lower, until the pointer touches the two rectangles between /i/ and /u/ as it passes across. Now the teacher stops the pointer on the rectangle to the immediate right of /i/ and waits. The students attempt this new sound. The teacher walks among them, listening carefully. She gives them simple feedback on their progress, sometimes simply nodding yes or shaking her head no, sometimes using other gestures to help them, sometimes offering simple advice in English or Japanese (“relax your lips” or “drop your cheeks”). After about five minutes, most of the students can produce an acceptable /ı/. The teacher now works with the students in the same way to get at the sound on the next rectangle over. After a few minutes, most students can produce /Ʊ/ reasonably well.
The teacher now holds the pointer again on /i/, eliciting this sound from the students. She makes a show of grasping her chin with one hand, and slowly pulling her jaw open while moving the pointer down through the two rectangles directly below /i/. She directs the students to do the same. They gradually open their mouths as the pointer moves down, and close their mouths as the pointer moves up. The teacher then touches the /ɛ/ rectangle directly below /i/ and works with students on this sound in the same way that she did earlier, circulating among them, listening carefully, and giving feedback through word and gesture. She does the same with the /æ/ rectangle. During this practice, a common problem among students is the tendency to glide towards /ʌ/ and /a/ as they open their mouth. The teacher works with students to keep their tongue forward and lips spread as the distance between their tongue and the roof of their mouth increases.
With the convention now established of vertical and horizontal movement among rectangles reflecting a similar movement in the vocal tract, the teacher moves the pointer down through the three rectangles below /ı/, and the students practice these successively more “open” vowels. She then moves the pointer to the right from /ʌ/ to introduce the more “back” /ɔ/, then down from there to the more “open” /ɑ/. The next five minutes is spent moving the pointer horizontally and vertically within this vowel grid, practicing these 11 vowels with particular attention to vertical and horizontal tongue position, and jaw and lip movement.
The teacher now introduces a game. She invites a student to say any one of the 11 sounds introduced thus far. After the student says the sound, the teacher waits a beat so that all the students can replay the sound in their heads, then touches the corresponding rectangle with the pointer. If the sound is between sounds, neither one nor the other, the teacher touches the area between these rectangles, and if the sound is very un-English, the teacher touches an area outside the chart. When the teacher brings the pointer down, there are often exclamations of joy or disappointment from the student that produced the sound, drawing laughter from the other students. Sometimes, the student who produced the sound will even try to “correct” the teacher by showing her the rectangle they were actually attempting. The teacher indicates that she heard the sound clearly, and congratulates the student on producing such a nice sound, even if it is not the one they thought they were saying.
As the game progresses, the teacher begins to clearly touch specific areas of the rectangles. If, for instance, the student produces an /ɑ/ that is a little close to an /ɔ/, the teacher touches the top part of the /ɑ/ rectangle, making sure the students notice this. This highlights the presence of allophones, different but acceptable ways of saying the same sound.
After about five minutes of this game, the teacher has a student come up to the front and point along with her. This adds to the playfulness of the game, as the teacher and student often point to different rectangles, again drawing laughter from the other students. Although this expansion of the game assigns a clear listening role to one student, it is important to note that, as was the case even when only the teacher had the pointer, the other students are also listening very carefully, then making their own silent guesses as to which rectangle will be touched.
Next, the teacher places a small magnet on each of the 11 rectangles. She invites a student to produce any one of these sounds. This time, rather than touching the rectangle, she removes the magnet from the rectangle. She invites another student to make a sound, and then removes the magnet from that rectangle. When a sound is produced for a rectangle that has already had its magnet removed, the teacher accepts the sound, then when she turns to take the magnet off the rectangle and finds it missing, she simply shrugs her shoulders and turns back to the class for the next student. When a sound is made that has not been introduced yet, the teacher places a magnet on this new rectangle, thus entering this new sound into the game.
The teacher now moves on to introduce some consonants. She touches a rectangle below the line on the chart, then the /a/ rectangle. She offers the pointer to a student, and gestures for the student to touch the same rectangles. The student touches the wrong rectangles. The teacher takes the pointer and touches the rectangles again. She gives the pointer back to a student, who touches the same rectangles in the same order. The teacher offers the pointer to yet another student, who also successfully touches the correct rectangles. The teacher says /sa/, and invites the students to say the same. She hands the pointer to a student, and waits. The student is puzzled at first, but then touches the two rectangles touched before. The teacher turns to the class and waits. A few students say /sa/. The teacher nods her head, and invites others to say this.
The teacher now begins to combine /s/ with the other vowels. She touches rectangles to create “see,” “saw,” “see-saw,” “sauce,” “cease,” “sis,” “so,” “ass,” “us,” and “sissy.” A few students have trouble with the pronunciation of “see,” saying “she” instead. The teacher accepts this, and touches the rectangles for this new word--/sh/ and /i/, thus introducing a new sound. After the students practice “see” and “she,” the teacher uses this new sound to help students practice the new words “shush,” “ash,” “sash,” “sheesh!” and “shoe.” Students begin to practice sentences, such as “She saw sauce” and “Sue! a see-saw!”
The teacher holds the pointer on the /s/ rectangle, eliciting a long /ssssss/ from students. She then moves the pointer to the rectangle below it. She pushes the pointer against the rectangle, and moves her hand to make the pointer tremble. Some continue to make the long /ssss/ and others experiment making other sounds. The teacher listens carefully to see if anyone comes up with the /zzzz/. Sometimes they do, sometimes they don’t. On this day, this class does not. The teacher smiles, shrugs, and says a long, clear /zzzzz/. The students practice this new sound. The teacher directs them to place their fingertips against their throat while she leads them back and forth between /s/ and /z/, drawing their attention to the vibrations present with the voiced /z/ and absent with the unvoiced /s/. The class then proceeds to practice with this new sound, the teacher touching rectangles to form such new words and sentences as “She says she sees us” and “Sue is as sassy as sis says she is.” The teacher is almost entirely silent during this practice, but is very active in listening to students, giving feedback through gestures, and touching rectangles on the chart to introduce more words and sentences.
In following lessons, the teacher continues to gradually put sounds into circulation, forming words and sentences for the class to practice. The order in which the sounds are introduced, and the specific words and sentences created, are guided by the teacher’s observation of the students. The nature of the English sound system does, however, suggest ways to efficiently introduce some of these sounds, just as it suggested a way in which to modify the original Sound/Color Chart. Here are a few segments from subsequent lessons.
/r/, /w/, and r-colored vowels
The teacher touches the /w/ and /a/ rectangles. She silently mouths /wa/, then invites the students to say this sound. They do so easily. The teacher then touches /r/ and /a/, and mouths /ra/, which looks almost exactly like /wa/ from the students’ perspective. The students know a different color cannot yield the same sound, so they have to experiment with their vocal tracts to find another consonant where the lips get puckered like a /w/. They struggle for a while. If no one produces a /ra/ after a few minutes, the teacher will model it once, just as she did earlier with /zzzz/. After about a minute, one student says /ra/. The teacher directs the others’ attention to this, and the sound gradually works itself around the classroom.
It is interesting to note that most of the students are not aware at this point that they are producing the /r/ sound. This for them is an entirely new sound, one that they probably would not have discovered had they begun with the letter “r,” or the IPA symbol /r/, which would have led them right back into the fossilized r/l pronunciation problem common among Japanese learners.
The teacher touches rectangles to form words and sentences with /r/, recycling previously introduced sounds with special attention to those that the students are still having trouble with. One such sentence the class finds challenging and fun is “Raw roe, raw fish, and soy sauce.”
With /r/ in circulation now, the teacher turns to the r-colored vowel sounds. She begins by touching /ɛ/, then drags the pointer to the rectangle immediately to the left, and while doing so lowers and retracts her jaw a little. The students begin searching for this new sound, as the teacher circulates among them listening carefully. The teacher finds an acceptable /ɛ˞/, and directs students attention to it. She touches this new sound then the /r/ rectangle a few rows below it, and the students work on this combination. The /a˞/ rectangle is introduced and practiced similarly.
Finally, the teacher touches just the /r/ rectangle, and has the students practice this sound in isolation. She uses various gestures to get the students to make the sound “harder” and less like /l/ or /w/. She pantomimes riding a motorcycle, turning the handle to rev the engine. She pantomimes a dog growling. She tells some to pull their tongues back more, some not to touch their tongues to the roofs of their mouths, some to pucker their lips more, and some to simply “do something different.” She has students who have the sound work with others who do not.
The teacher now touches the /ɚ/ rectangle, and draws students’ attention to the fact that its color is very similar to that of the /r/ rectangle. She touches them both and leads the students to pronounce this as /r/. While strictly speaking these two rectangles are /ɚr/, the sound in the American pronunciation of such words as “word” and “bird,” the teacher knows from experience that putting any sort of vowel at all before the /r/ will lead students to put too much vowel there (“hard” rather than “heard”). Treating these two rectangles as /r/ may cause some problems later, but these problems are more easily fixed. The teacher touches rectangles to form words and sentences with these new sounds.
Voiced and Unvoiced Final Consonants
The teacher touches the rectangles for “bag,” and the students say this. She then touches the rectangles for “back,” the only difference of course being the last rectangle. The teacher gestures for the students to say “back” quickly. She returns to “bag,” and gestures for the students to say this slowly. She lays the pointer across the row of voiced consonants on the chart and makes the same “slowly” gesture she used before, then she lays the pointer across the unvoiced consonants and makes the “quickly” gesture. She then touches rectangles to have the students practice both words with voiced and words with unvoiced final consonants.
/l/ and /n/
The teacher draws the students’ attention to a column of four rectangles in the consonant part of the chart. She touches the top one, /a/, the second from the top, /a/ again, the third from the top, /a/ again, the bottom one in the row, then finally /a/ again. She waits. Some students begin uncertainly with /tada/, then stop. The teacher silently mouths /tadanala/. She does so slowly and in a slightly exaggerated way, and it is easily seen why these rectangles have been put in the same column, as they all seem to be made in a similar way, with the tongue touching the back of the upper front teeth or just behind there.
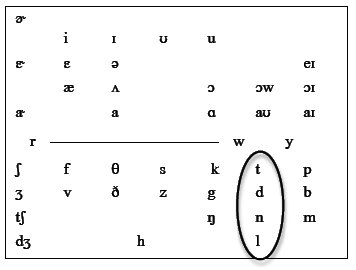
The students try to come up with four consonants that are made in this way. They already have /t/ and /d/, as these were introduced earlier. One student says /na/, and the teacher accepts this, pointing at the /n/, then the /a/ rectangles. The students go on for a minute or so, but cannot come up with /l/. The teacher models /la/, and points at the two rectangles for this. That /l/ is articulated near the front of the mouth is news to many of these Japanese students, who have been making this sound further back, where the closest Japanese sound is made. Students go on to practice words with these sounds, such as “tunnel” and “McDonald’s.”
Word Charts
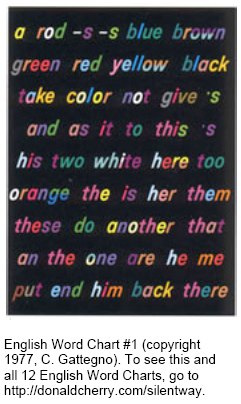
The teacher puts Word Chart #1 next to the Sound/Color Chart. The words are colour coded for pronunciation. The teacher touches “the” (with a red “e,” for /ði/). Not yet appreciating the significance of the colors, or noticing that there are two occurrences of “the” on the chart, most students say /ðə/. The teacher then touches that “the” (the one with a bright yellow “e”) and the students express some surprise. A few say /ðə/. The teacher returns to the first “the,” and this time several students read it correctly as /ði/. A few students nod their heads and say “ahhh,” as they come to understand the relationship between the Sound/Color Chart and the word charts. The class goes on to practice other words on the chart, then phrases and sentences, such as “as it is, it is, is it not?” “His back’s black and blue” and “Take two there, and put one here and the other one there.” The class focuses on suprasegmentals, occasionally returning to the Sound/Color chart to work on sounds.
Suprasegmentals
Much of the work on suprasegmentals is done by the teacher assigning to her fingers the words of a phrase or sentence as the students say them, then working with them once there. The teacher can, for example, place fingers together where the words link or separate them where there should be a pause. Once establishing the convention of the tip of the finger being the beginning of the word, and the base being the end of the word, the teacher can work on elision by covering one part of a finger. She can work on liaison by running the pointer down each finger, and stopping briefly before each liaison. For example, with “an apple a day” beginning on her right hand thumb and ending on the ring finger, the teacher would stop halfway down her thumb (/ə/), then down the rest of her thumb and down the forefinger stopping just before its base (/næpə/), then down the rest of the forefinger and all the way down to the base of the middle finger (/lə/), then finally down the ring finger for “day.”
One way that the teacher has the students work on sentence stress and rhythm is to hold the pointer before her, and tilt it back and forth like a metronome as the students say a sentence. So for “aN Apple a DAY” (sentence stress marked with capital letters), the pointer would begin pointing straight up, then gently tilt to one side (“a”), stop abruptly (“NA”), begin moving back in the other direction (“pple a”), then stop abruptly tilted in the other direction (“DAY”).
Realia
With a solid foundation in the English sound system, the teacher begins to have the students focus more on the meaning of the sentences they are producing. While working on the melody of the sentence “his are blue and hers are white.” the teacher takes a student’s hand, extends the index finger and points it first to the blue shoes of a male student then the white ones of a female student. Several sentences are then elicited by having students point at objects around the class. As the vocabulary expands, students produce such sentences as, “His pants are black and her shoes are too” “Her shoes are not as white as his are” and “One of hers is not as white as the other one.”
In following classes, language expands as the teacher introduces more word charts and realia, such as a box of Cuisenaire rods, wall pictures, maps, toys, kamishibai (Japanese picture story cards), and many simple, everyday items from home or school. This realia, in conjunction with simple gestures and mime, is used to both elicit language and make clear the meaning of language produced. Students speak to each other in pairs and groups. The teacher observes the students carefully, providing feedback and watching for natural opportunities to introduce additional situations or language. While no longer the primary focus, the Sound/Colour Chart continues to be displayed in the classroom and is referred to from time to time when the need arises.
The Sound/Colour Chart provides a unique and elegant entry to the pronunciation of a new language. It allows teachers and students to temporarily isolate and work on the challenge of producing the new sounds and melody, independent of the meaning and the script. The chart respects and makes use of what can be done visually, recognizing the problems that can result by introducing new sounds and new combinations of sounds aurally. The Sound/Colour Chart does all this simply and concisely: I have just tried to make it even more simple and concise by eliminating unnecessary rectangles and arranging the remaining rectangles in a more logical order to help students work more efficiently with the chart.
Avery, P. and Ehrlich, S. (1992). Teaching American English Pronunciation. Oxford: Oxford University Press
Catford, J.C. (1988). A Practical Introduction to Phonetics. New York: Oxford University Press.
Gattegno, C. (1963). Teaching Foreign Languages in Schools the Silent Way. New York: Educational Solutions.
Gattegno, C. (1976). The Common Sense of Teaching Foreign Languages. New York: Educational Solutions.
Moyer, B.M. (1977). Pronunciation and the Silent Way Fidel. Master’s Thesis: School for International Training, Brattleboro, VT, USA
Underhill, A. (1994). Sound Foundations. Oxford: MacMillan Heinemann.
Young, R. (1999). ‘Experimenting with the Sound/Color Charts in English and French.’ Caleb Gattegno’s Science of Education: Ten Years After Conference Proceedings. New York: Educational Solutions.

Please check the Pronunciation course at Pilgrims website.
Please check the Secondary Teaching course at Pilgrims website.
Please check the English for Teachers course at Pilgrims website.


|