For more activities from Pilgrims read Creating Calm in the Classroom”: Pilgrims Training Session by Dave Read, Alphabet Games: a Pilgrims Training Session by Hania Kryszewska and Tense Experience: A Pilgrims Training Session by Emmanuelle Betham
Talking Through Pictures: A Pilgrims Training Session by Marian Zamorski
Peter Clements, UK
Peter started out teaching EFL and then ESOL in the Adult and Community Learning sector in 2007. He enjoys working with a variety of students from inside the European Union as well as long-term UK residents from various other countries. E-mail: peter.clements@talktalk.net
Menu
Introduction
The English living room
American and British houses
Go compare!
Describe and draw
Jigsaw pictures
This session was a reminder of the importance of visual stimulus and what can come out of printed images. That is meant not to understate the value of projected digital images which are readily available and need no printing materials or physical storage. However, when it comes to comparisons and activities where a picture is concealed in order to create a gapped activity, a good stock of pictures from different sources, pasted onto cards and preferably laminated, can still be so useful.
Demonstrating a recall activity using adjectives that describe damage such as ‘torn, rusty, peeling, scorched, faded, tattered, cracked, broken, rickety’ etc, Marian had the group describe where these conditions might be found in a general sense, linking them to nouns such as ‘a rickety chair’, a rusty car’ and so forth.
Having served the purpose of recalling the concept, the focus was narrowed to that of the home and in particular the living room. In pairs, we formed a mental image of a living room thus activating the individual schemata, and described items within that living room such as faded curtains, a worn sofa, a rickety table, a rusty radiator perhaps.
The next stage involved viewing a picture of a typical living room with items named but the adjectives on loose laminated cards to be placed next to the item in question. This involved a certain degree of mind shift; for example there was a radiator in the picture but instead of being rusty as I had visualized, it was damaged in that the paint was peeling. The curtains weren’t faded but the carpet was, whereas the bottom seams of the curtains were frayed. So the value in this was to not only revise a lexical set, but to apply it in a familiar context in the mind then re-applying the lexis in a similar but altered view in a picture. For example, might be comfortable to imagine a rusty metal radiator but to apply ‘rusty’ to a window might be harder if you are not familiar with metal window frames such as those typically found in some English council houses.
Participants were next shown a selection of houses. These were noticeably American in style. Brownstone tenements in rows, clapboard sidings for semi and detached houses, wooden shingle roofs, screen doors and porches. At first this seemed a world away from the British English environment, but then Marian asked us to come up with names for any English equivalents we could think of. So ‘porch’ in Am Eng would be ‘balcony’ and ‘terraced’ instead of ‘row houses’. Again, this effectively activated the schema of ‘English’ style houses and probably created a three way comparison with the style of housing in the participants’ own countries.
The next step was to introduce comparative pictures of English housing that could be visually compared with the American pictures.
The foreseeable benefit for my ESOL students is that one of their exam topics might require them to discuss likes/ dislikes about accommodation in the UK. Being able to compare and contrast differences will add value to their discussions. (A common difference students often mention is how UK bathrooms often have separate hot and cold taps in the baths and hand basins which strikes them as quite quirky and means that it’s easy to scald your hands when washing them under the tap - who has time to put the plug in and run a basin of water for a quick hand wash?)
Marian displayed a list of American English terms with their British English equivalents. Some of this would be needed in the following activity.
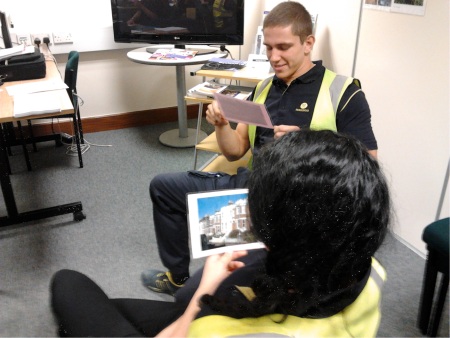
A cursory glance at two pictures we were issued in pairs side by side might not have revealed any significant differences. However, in pairs, not being able to see each other’s pictures led us to compare and find numerous tiny differences in each. The key to this was that we had just been told to describe each other’s pictures as if they were completely different, but it seemed as if we were describing the same thing until minute differences began to emerge. The pictures were in colour and carefully laminated and many of the differences were in small aspects of colour of clothing, fruit on trees and other tiny details.
Examining a picture in such detail seemed very different to the typical quick comparison of a half a dozen or so differences in a pair of black and white photocopies from a typical EFL resource pack. The greater the detail, the more advanced the phrases which are needed to question and describe positions and whether things exist or are missing.
An old favourite is having learners working in pairs with one describing a picture and the other interpreting and drawing it on a sheet of paper. This is usually with the started teacher finding a couple of suitable pictures, copying enough for half the class then only to find that some learners have managed to achieve remarkably accurate results through very little linguistic effort. To overcome this, a greater selection of different pictures can be used to prevent collusion between pairs. At the same time, thin paper that can be seen through from behind should be avoided. Really, there should ideally be a different picture each for half of the number in class. Marian had a good selection, laminated for re-use and by avoiding the means of ‘cheating’ (after all it could be driven by fear or self consciousness when everyone is doing the same thing) learners can focus on the language and the fun aspect of the activity. Needless to say, the ‘artist’ should not ask for visual clarification (“Is this what you mean?”) until the conclusion when the pictures can be openly compared. However, clarifying expressions ( “OK, you want me to draw a guy walking from the left to the right about half way up the page in the middle - is that what you mean?”) are to be encouraged and it may be helpful to set any specific guidelines at the start of the activity.
The pictures to be copied were simple line drawings, hand sketched and similar in style. Learners need to have some knowledge of positional vocabulary, shapes, adjectives, and relevant nouns. The activity really lends itself to the use of similes and description (well, he’s wearing a hat a bit like a round hat a London businessman wears but for a farmer”) . Learners have to decide whether to start of by describing the overall picture or to start off with individual sections and details which might lead to running out of space or drawing things disproportionately.

Typical pictures such as these can be found on Internet by a Google image search - or by simply drawing your own!
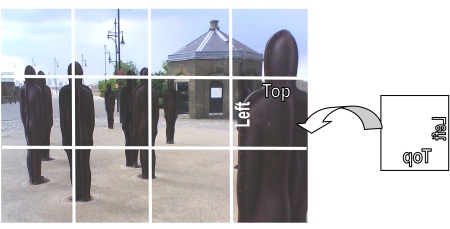
The final activity was how a fairly large laminated picture is cut into squares and one piece issued for each learner. Individuals study their piece (or pieces if there are more than one each to go round) in order to give a verbal description. In the mingle stage that follows, the aim is to describe your own piece, listening to the descriptions of others so as to find a likely match. Once found, without looking at the cards, they should be placed face down on a surface and left until everyone has finished. Once all the pieces are down, they should be turned up to see if the picture fragments have been positioned correctly. Like a literal jigsaw, the more diverse the areas of colour in the overall picture, theoretically the easier it should be to work out (“My bit of head with part of a roof on the left and some sky probably goes near the top on the right.”) but the activity could be even more challenging with more subtle variations of background. Bear in mind that sections might be flipped vertically or horizontally (or both) when placed face downwards (see below) which will then generate further discussion in order to make adjustments when the pieces are turned over and revealed.
At the end of this session I resolved to make greater use of tactile pictures in my future classes. I have tended to use projected images with the interactive whiteboard which are great too, but the element of concealment, surprise and re-forming pictures during mingle activities is more effectively accomplished with the printed format. Time to resume cutting out all those useful pictures in brochures, magazines and newspapers methinks!

Please check the Creative Methodology for the Classroom course at Pilgrims website.
Please check the Methodology and Language for Primary Teachers course at Pilgrims website.
Please check the Methodology and Language for Secondary Teachers course at Pilgrims website.


|