The Sea! The Sea! Sustainable Development Goal 14 in a CLIL Process*
Judit Fehér, Hungary
*Goal 14: Conserve and sustainably use the oceans, seas and marine resources
ages 8 – 12
Judit Fehér is a teacher, teacher trainer and materials writer based in Hungary. Her main professional interests are creativity in language teaching and task-based, content-based learning. She is co-author of Creative Resources with Bonnie Tsai. She is a Pilgrims trainer, who also runs CLIL courses. E-mail: jr.feher@gmail.com
Menu
Introduction
Seawater
Life in salt water
Plastic pollution: Duck story
Materials
Key
Introduction
I was in the 4th form when, after a break, our teacher came back to the classroom with both her hands full of bits of bread. She put them in a pile on her desk and asked us where we thought she had found them. We could not guess: she had picked all of them up from the floor in the corridor. We had carelessly thrown all that fresh bread away. For the rest of the day, our topic was bread. We explored what work was done before it reached our tables; we heard and read stories about people without bread to eat. I don’t think I have ever thrown bread carelessly away ever since. What she did then must have had some deeper meaning to me: it wasn’t simply ‘do this’ and ‘don’t do that’. I understood and felt.
In this article, I propose a CLIL process which aims to bring students both intellectually and emotionally closer to sea life and to the idea of protecting it even when far away from the sea. CLIL with its cross-curricular and intercultural approach and its focus on developing thinking skills offers a perfect framework for reaching this aim.
In the process presented here, students first learn about seawater, then the life it sustains and finally one of the greatest threats to marine life: plastic pollution. To understand, students do many different things e.g. they listen, watch, taste, imagine, act out, improvise, solve problems, do experiments and artwork. The different parts are loosely built on each other, meaning that they form a logical procedure, but components may also stand alone or become a part of a different procedure. You will find these components:
- Seawater
- Lead-in
- Water sounds
- Find the seawater!
- Making seawater
- Preparation
- Action
- Further ideas
- Life in salt water
- Introduction
- Under the water
- Sea animals and diving
- Artwork
- Follow-on activities
- Plastic pollution: Duck story
- Introduction
- Telling the story
- Follow-on activities
- Materials
- Key
Subject focus: English: expressions for sounds of water; tools and procedures for experiments
Geography: different seas and salinity
Science: measuring weight; making a solution
Prerequisites: A2 level English; for step 4: some understanding of weight measurements (kg, g), numbers from 1 to 2000
Preparation
-
-
Choose and download about five or six water sounds, some of which belong to the sea e.g. from these sites:
www.orangefreesounds.com/category/sound-effects/nature-sounds/water-sounds/
http://soundbible.com/tags-water.html
www.partnersinrhyme.com/soundfx/watersounds.shtml
- Decide in what order you will play them and give each a number.
-
Prepare four jugs of water: 1. tap water; 2. average seawater with the salinity of 35 g of salt in a kg of seawater (See below how to make it.); 3. less salty saltwater than the average seawater; 4. more salty saltwater than the average seawater. Write numbers 1 to 4 on the jugs.
- Get these ready: four permanent markers; 4 (paper) cups or beakers for every group of five students; a straw for each student.
- Print page 1 of task sheet ‘1/C. Find the seawater!’ or make it available electronically.
-
Make these available: 5 x two / three one-litre jugs or beakers, one of them preferably volumetric; food scales (1g/1kg); weights if needed: 1x1g, 2x2g, 1x5g, 1x10g, 2x20g, 1x100g, 1x200g, 1x1kg; about 1/2 kg of salt; a straw for each student
- Print task sheet ‘1/D. Making seawater’ or make it available electronically.
Procedures
- Lead in
- Show beautiful images of the sea / ocean and ask students if they like to be at the sea. Have a little chat with them about their experience of the sea.
- Tell them that for the lessons of this module they will be at the sea.
- Water sounds
Tell students that they will hear sounds of water. They will decide which water sounds are from the sea.
- Get students to write the numbers you allocated to the sound tracks on a piece of paper. Play the tracks always announcing their number. Ask students to tick the numbers of the tracks they think are from the sea.
- Play the recordings again and get students to vote if the sounds are from the sea. Use this step as a way of teaching some water-related vocabulary, e.g. crashing waves, splash, lap
- Get groups of three students to become waves: They fold their arms and go to one end of the room where there is clear space. First they are gentle, small waves: they walk to the opposite wall and gently ‘lap’ against it. They become bigger- and bigger: add students and get them to move faster and mime a more and more dramatic ‘crash’. Encourage students to make sounds, too. Instructions you may use: “Move slowly and gently, lap gently against the shore, move quietly. First lap, second lap third lap. You are more and more powerful, bigger and bigger, you move faster and faster. You are huge! You crash against the shore with a big splash.”
- You may want to ask some students to give the instructions for different groups of students.
- Find the seawater!
Play a sea sound track. Ask students to close their eyes and tell them: “You are swimming in the sea. The water is nice and cool. A big wave comes your way and …. now there is some water in your mouth. Taste it. What does it taste like?” Elicit: salty.
- Put students into groups of five. Tell students that they will taste four different clean samples of water. Their task will be to guess which one is most like seawater.
- Give out task sheet ‘1/C. Find the seawater!’ and ask students to do exercise A.
- Check answers: ask students to say keywords for the tools and show them, e.g. jug /bottle, cup / beaker, straw, permanent marker; and the actions they will need to perform: pour, taste.
- Get students to follow the steps in A and do exercise B.
- Get students to compare answers. Then reveal which jug had the typical seawater.
- Making seawater
Preparation
- Ask students how salty they think seawater usually is. Collect their ideas on board, e.g. very salty, a little salty, too salty.
- Project or write this on the board: There are 35 parts of salt in every 1000 parts of seawater. Ask students to say how this answer is different from theirs. Elicit that it is a fact, not a personal opinion. Tell students that to make the seawater they tasted, you used this sentence as your recipe. What ‘parts’ did I use?”
- Get students to do exercises A then B of worksheet 1/D. Making seawater. Discuss the answers.
- Show the scales to students and elicit / teach the word. Ask what we do with the scales to elicit / teach ‘measure the weight of things’.
- Tell students that now you would like them to figure out how you made the seawater, using the ‘recipe’ you have shown them. Go over the materials and tools they will have and show them the list in Ex. C. You may want them to draw (some) of the materials and tools next to the words.
- Put students into groups of 4 to 6 and distribute the materials. If you have both a digital and a balance scale with two pans, get half of the students to work with one and the other half with the other kind of scales. Give the students who work with the balance scales two identical containers.
- Tolerate use of the mother tongue as students are discussing, but also encourage miming steps if students cannot word a step in English.
- Make mixed groups and get students to compare their answers.
- Agree on the best steps all together. You may want students to draw the steps on the board and / or mime the steps as they say them.
Action
Tell students that the seawater they tasted is the average / usual seawater and that there are saltier and less salty seas. Tell them that in groups, they will make different kinds of sea water.
Put students into five groups. Give each group one of the slips in D. Ask groups not to share the information on their slips with other groups.
- Ask groups to do Ex. E and either ‘a’ or ‘b’ of Ex. F depending on the scales they have. Tell groups to call you if they need help and when they have completed the steps. Make sure you check each group’s completed steps before they start making their seawater.
- As you monitor, give each group a permanent marker and ask them to write the number on their slips on the container for their seawater.
- When groups finished, get groups to taste all the seawaters in a rotation system and using their straw. Tell them to put down the numbers of the seawaters from the saltiest to the least salty.
- As you check the order of salinity with the class, ask groups to show their seas on a (projected) map and tell the class how much salt there is in that particular seawater. You may also want to show students some images of the seas.
Further ideas
- For smaller children or to save time, you can give groups out the right quantity of salt to make their salt water.
- If you gave volumetric beakers to students, you can get them to compare weight and volume: the volume of a kilogram of fresh water and the volume of a kilogram of different salt waters.
- In classes where they already understand percentages, you could get students to calculate the percentage of salt in the different seawaters. Get them to find the simplest way, which is dividing the number of parts of salt by 10.
- Ask students what the reasons for different salinity may be and elicit rain, hot / cold weather, connection to rivers, other seas and oceans. You may also want to get students’ ideas on why they think the Dead Sea is called ‘dead’.
- Save the saltwater you have made for further experiments such as turning it into fresh water or making salt. You have some ideas how here:
www.wikihow.com/Turn-Salt-Water-Into-Drinking-Water, www.wikihow.com/Make-Sea-Salt
Subject focus: English: names of sea animals, expressing what you see under the water
Biology: sea animals, exploring underwater life
Art: making a picture of underwater life
Prerequisites: A2 level English
Preparation
-
Each pair of students will need a stopwatch (e.g. in a mobile phone)
-
Print Ex. 2/2. ‘Under the water’ for each student or make it available electronically
Get these ready: computer, projector, sound, art supplies, torch(es)
- Introduction
Tell students that for some time you will move under the sea / ocean, into the salt water they know so well now. Ask them if they have ever been under the sea and get them to tell you about any experience they have had of sea life.
Ask students how long they can hold their breath. Show and get students to do these after you: “take a deep breath, hold your breath”. Get pairs to time ach other. Find the students who can hold their breaths for the longest periods of time.
Under the water
Sea animals and diving
- Tell students that they will go under the sea for one breath and look around under the water. Tell them to sit comfortably, close their eyes and imagine that they are in the sea. Tell them to take a deep breath at the count of three, hold their breaths and imagine that they are under the sea. Ask them, “What is the water like? What animals, plants, colours can you sea? When you can’t hold your breath, come up and open your eyes.”
- Get pairs to share what they saw with each other and then with the whole class. Use this opportunity to teach some sea animal names students describe or name in their mother tongue. I recommend teaching these sea animals even if students don’t name / describe them: crab, sea urchin, shellfish, starfish, jellyfish, coral, seahorse, octopus, shark, dolphin, whale and anglerfish. The list goes from animals found in costal, shallower water to deeper water. Find and project their images as needed or show short extracts from documentaries, e.g.:
- The weird world of the sea urchin
www.youtube.com/watch?v=WI7ZCK8aWoM
- shellfish:
Clam / Sea Scallop swimming / jumping underwater. Mulroy Bay, Ireland
www.youtube.com/watch?v=5vRHlEep9iU
- Red starfish moving, tentacles, close up, marine
www.youtube.com/watch?v=f1ZBdOQnf-k
- Exotic Jellyfish www.youtube.com/watch?v=aJUuotjE3u8
- What is a Coral? www.youtube.com/watch?v=47vGQh4BGKM
- Seahorse
Documentary National Geographic For KIDS 2016 BBC
www.youtube.com/watch?v=eTqXCCp3DpI
- Amazing Octopus - Most Intelligent Animal on Earth? 1080p
www.youtube.com/watch?v=_G6eH1KDl0s
- Ocean Ramsey diving with sharks www.youtube.com/watch?v=Vtv4uh53vYs
- Dolphins
: The Wild Side www.youtube.com/watch?v=B_usbiIEAnM
- Stunning High Definition Underwater Footage of the Blue Whale
www.youtube.com
- Anglerfish:
Weird Killer of the Deep | World's Weirdest
www.youtube.com/watch?v=XUVerZsbYiw
Get students to do Ex. 2/B. ‘Under the water’. Help with reading words as needed.
Get students to stand up in a circle and get them to mime the animals, what they look like, how they move and what you should or shouldn’t do to them. Here is a possible list:
Crab: walks sideways
Sea urchin: spiny, careful, don’t step on them! ouch!
Shellfish: sits in the sand, the shell closes and opens a little, can move
Starfish: five arms, losing arms and growing new arms, moving slowly on the sea floor
Jellyfish: umbrella shape – moving: opening and closing the umbrella, stings
Coral: does not move, don’t touch it, don’t break it!
Seahorse: swims upright, males carry babies and give birth
Octopus: eight arms, three hearts, nine brains
Shark: back fin, fast swimming, dangerous (?), many teeth, changing teeth
Dolphin: breathes the air, long snout, jump, ‘sing’, play, learn, clever
Whale: huge, blows air through a hole on the top of its head
Anglerfish: in the deep sea, lives in darkness, they have a ‘fishing rod’ on their head, they make light
Ask students how people can stay longer under the water. Get their ideas and then show them the video ‘Exploring the Ocean for Sixty Years’ on the National Geography website: http://video.nationalgeographic.com/video/160928-sciex-bje-sylvia-earle-ocean-explorer?source=searchvideo
Ask them to name any animal they know and find the three ways of staying under the water for longer than your breath. These are: scuba diving, using a submersible / submarine and snorkelling. You may want to give students a 3D experience of diving using these 3D videos on YouTube: 360° Great Hammerhead Shark Encounter | National Geographic www.youtube.com/watch?v=rG4jSz_2HDY and Scuba Bahamas 360 Vr Underwater www.youtube.com/watch?v=rV1-K-7AdSE
Artwork
- Ask students if they would like to go under the water as in the videos. Tell them that this is what is going to happen with art: they will imagine that they are under the water and see some animals and plants under the water. They will paint or draw them.
- Give out art supplies.
- As students are working, you may want to play some underwater videos silently, e.g. the ones above and / or these:
- As students are making their underwater pictures, collect the names of sea animals and plants they are depicting.
Follow-on
When students have finished, put their pictures on the walls and call out names of animals / plants depicted. Get students to show the pictures where they see them.
Now tell them that you will go under the water in a submersible. Darken the room if possible and get a torch. Call all the students near you and start moving form one picture to another, directing the light of the torch on the picture you want to move next to and saying e.g. “Look at that beautiful animal there! Let’s have a closer look. Oh it is jumping! Is it a dolphin?” Etc.
When students get the idea, give the torch to them to lead the expedition. You may want to put students into groups of 3 to 6, give each group a torch and give them about 5 minuets to make their own underwater trip. Then get groups to share what happened during their trip. They could write this up with illustrations and share as booklets or online.
Subject focus: English: collective story making
Geography: the Pacific Ocean, sea currents, the Great Pacific gyre
Citizenship: plastic pollution, the reasons and what to do to help
Prerequisites: A2 level English; understanding north, south, east, west; basic map reading
Preparation
- Bring to class a bowl of water, a rubber/plastic duck / ducks or an image of them; some plastic rubbish: plastic bottles, bags, wrapping, etc.
- Find a map of the Pacific Ocean on Google Maps, and learn how to move from the map to images of places in the map.
- Find images of an iceberg, the Great Pacific Garbage Patch and any other place you would like to show e.g. on Google Images .
- Have a computer, projector and sound available.
- Introduction
Invite students to the bowl of water. Demonstrate Current, gyre, float, sink
- Elicit garbage.
- Identify north, east, west, south in the classroom.
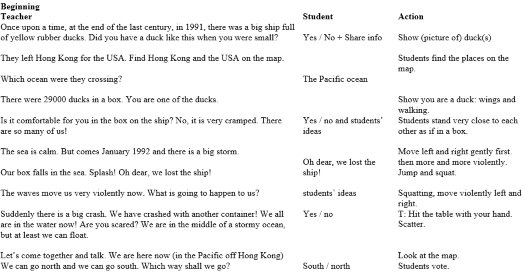
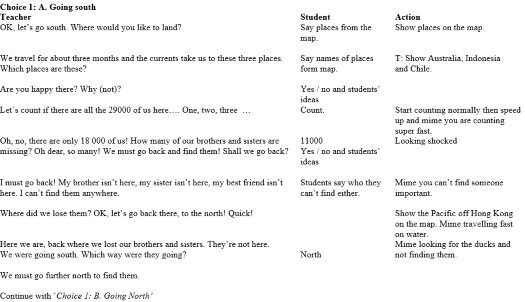
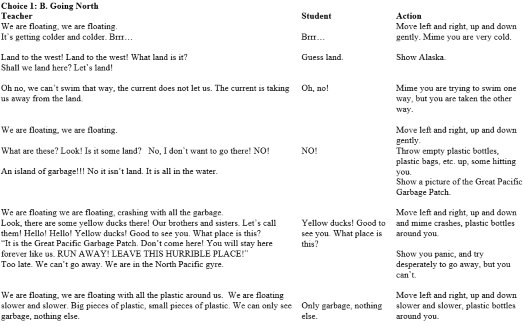
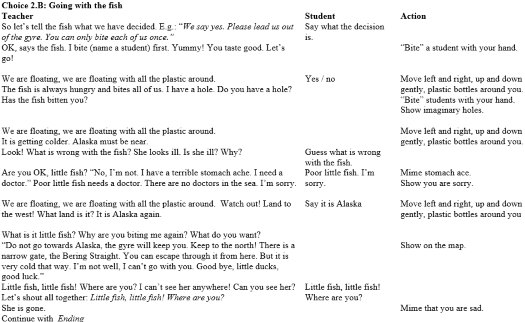
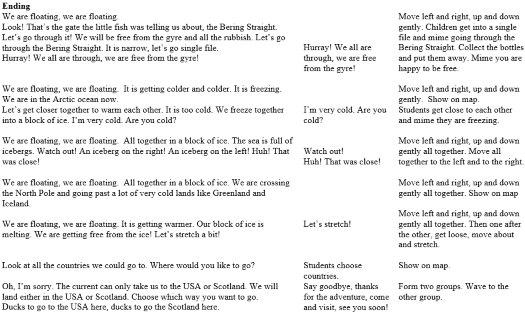
- Telling the story
Best to have some flexible seating, where students can easily stand up and move about, e.g. sitting in a semi-circle on the ground.
- The story is a real-life story which offers some choices. Follow students’ choices and additions as much as possible. The procedure described below is only for reference and to give you ideas.
- What is listed in the ‘Student’ column is not complete. It shows the absolute minimum student contribution. It is good to get students to repeat some of the things you say and let them repeat anything they want to or say what is on their minds or invent any movements. Repeat, refer to and build on any valuable contributions.
- The story can be done in one go or spread out over a period.
- Follow-on activities
- Ask students if they want to stay in the USA or Scotland or come back to their country, why and how.
- Ask groups of students to mark the route on a map. Ask them to guess how long it took in real life and how many miles / kilometres, etc. See the animated film, ‘The epic journey of the plastic ducks’ on YouTube www.youtube.com/watch?v=AvchlWftt80 to find it out.
- Get students to do experiments with different kinds of waste: organic, plastic, metal. What happens to them in the sun and rain?
- Ask students how they think plastic gets into the sea? Have a chat then act this out: You put a plastic bottle or a bag into a container for general waste / you drop them in the street. Ask students: “I am far from the sea. Can my bottle / bag end up in the sea?” Show this animation to them to elicit that water carries things from the land, and they often end up in the sea. https://68.media.tumblr.com
- Ask students what we can do to make things better. You may want to introduce the three R’s: reduce, reuse and recycle with this song: Mitchel Musso - The Three R's (Official Music Video) on YouTube www.youtube.com/watch?v=mL2gTqic_BY . In research groups, children can find ways of reducing, reusing and recycling. As an outcome for the research, students could make posters to teach others in the school or organise events, e.g. cleanups, swapping, selective waste collecting, etc.
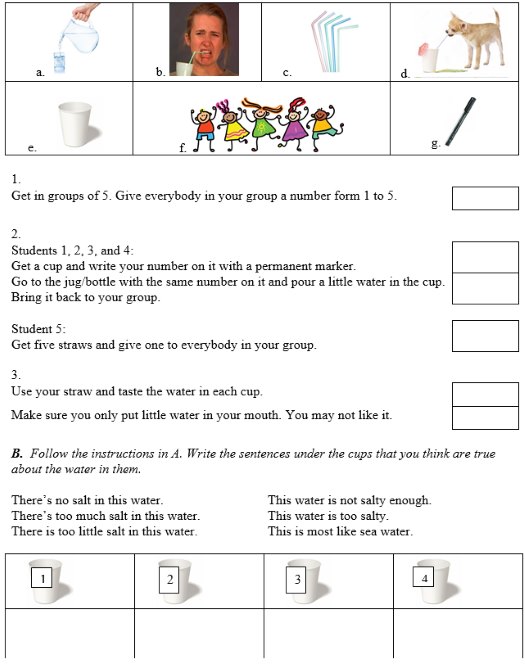
1/C. Find the seawater!
A. Read the instructions below. Match the illustrations to the steps.
1/D. Making seawater
A. Measuring water and salt
“There are 35 parts of salt in every 1000 parts of seawater.”
What can those ‘parts’ of salt and ‘parts’ of water be?
a. Write water or salt or both water and salt on the dotted lines.
b. To make seawater, which of these ‘parts’ or units can be good? Why?
B. Complete this:
1 kg = ………….….. g
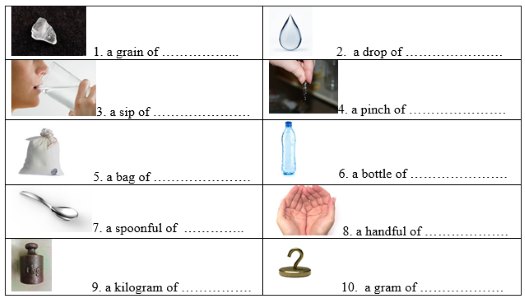
C. How can you make seawater? Tell and show the steps to each other. Draw the steps.
You have
a jug/bottle of water
one container (or two) for the seawater, e.g. a beaker/jug
salt
scales
a stirring rod / a spoon / a ruler
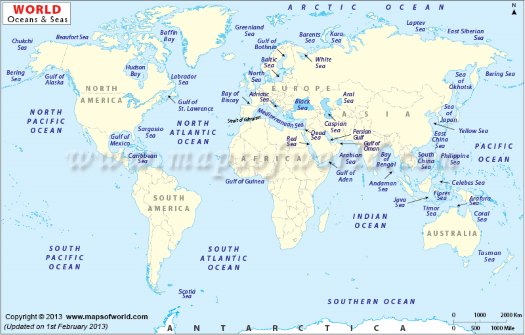
D. Making different kinds of sea water Slips
1.
Baltic Sea
There is 10 parts of salt in every 1000 parts of Baltic Sea water. |
2.
Black Sea
There is 18 parts of salt in every 1000 parts of Black Sea water. |
3.
Mediterranean Sea
There is 38 parts of salt in every 1000 parts of Mediterranean Sea water. |
4.
Red Sea
There is 40 parts of salt in every 1000 parts of Red Sea water. |
5.
Dead Sea
There is 340 parts of salt in every 1000 parts of Dead Sea water. |
E. Your teacher gave you the name of a sea. Mark it on the map.
F. Your teacher gave you the ‘recipe’ of the seawater in your sea. How to make it? Complete the steps.
Making ……………………………..…. Sea water
There is ……………….. g of salt in a 1000 g of ……………………… Sea water. This is how you make it:
a. Using a digital food scale  and only one container and only one container 
- Measure your container. Its weight is: ……………. g.
- Put the ……..……. in the container:
the weight is …………. g + ………… g = ………….. g.
- Fill it up with ……………….. to this weight: …………….. g
- Stir it well.
Finished? Check it with your teacher. Then make the seawater.
b. Using balance scales  and two identical containers = and two identical containers =
- Put one of the …………… into either dish of the balance scales.
- Put a weight / weights of ................ g in one of the dishes of the scales. Put ………… in the container in the other dish of the scales to balance it up.
- Change the small weight(s) for a ……… weight in the dish of the scales with the empty container. Add ………….. to the container with the salt in it to balance it up.
- Stir it well.
Finished? Check it with your teacher. Then make the seawater.
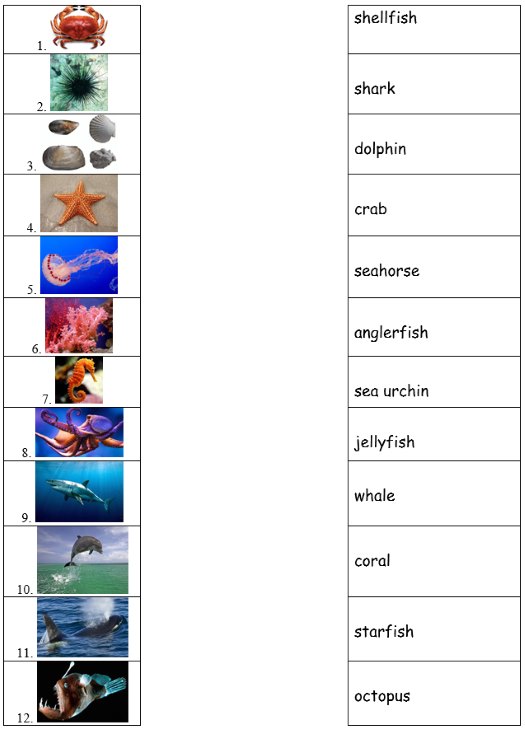
2/B. Under the water
Acknowledgement: All images are from Google Images
1/C.
A.
1.f; 2.e+g , a. c; 3. d, b
B.
There’s no salt in this water. (This water is not salty enough.)
This is most like sea water.
There’s too little salt in this water. This water is not salty enough.
There’s too much salt in this water. This water is too salty.
1/D.
A.
1. salt; 2. water; 3. water; 4. salt; 5. salt; 6. water (+salt); 7-10. water +salt
- 1 to 6 aren’t good because they go either with salt or water, but not with both.
- (6,) 7 and 8 go with both salt and water, but they change a lot, e.g. whose hands, how big a spoon, how full.
- 9 goes with both salt and water and it is fixed, it does not change, but it is too big: 1000 x 1 kg can be the weight of all the students in the class!
- 10 is the good unit because it goes with both salt and water, it is fixed and it is small enough.
B.
1 kg = 1000 g
F. Example: Making …Baltic... Sea water
There is …10.. g of salt in a 1000 g of ……Baltic… Sea water. This is how you make it:
a. NB! The weight of the container is only an example.
1. Measure your container. Its weight is: …180. g.
2. Put the …salt……… in the container:
the weight is …180………. g + …10……… g = ……190….. g.
3. Fill it up with …water……….. to this weight: …1180……. g.
b.
1. Put one of the ……containers……… into either dish of the balance scales.
2. Put a weight / weights of ...10…g in one of the dishes of the scales. Put ……salt….. in the container in the other dish of the scales to balance it up.
3. Change the small weights for a …1 kg…… weight in the dish of the scales with the empty container. Add …water……….. to the container with the salt in it to balance it up.
2/B
1. crab, 2. sea urchin, 3. shellfish, 4. starfish, 5. jellyfish, 6. coral, 7. seahorse, 8. octopus, 9. shark, 10. dolphin, 11. whale, 12. anglerfish

Please check the CLIL for Primary course at Pilgrims website.
Please check the CLIL for Secondary course at Pilgrims website.
Please check the Creative Methodology for the Classroom course at Pilgrims website.


|